Codeine .Net RSS 2.0
# Sunday, 20 January 2008

    So far I have went over how to create a basic workflow activity that evaluates a regular expression against a string and I have also covered creating the validation class for the activity. The next thing I want to cover are some basics to enhancing the designer experience of the workflow activity allowing you to override the default visual display in the designer for a custom activity. Based on the default designer class our RegEx activity appears as follows:


    The first thing that needs to be done is to add a new class to the project called RegExDesigner.cs.


    Next we need to make our new class inherit from the ActivityDesigner class. To do this we will also need to import the namespace System.Workflow.ComponentModel.Design, which means your code should now appear as follows:

    using System.Workflow.ComponentModel.Design;


namespace FloFactory.Activities.Util.Logic

{

    public class RegExDesigner : ActivityDesigner

    {

    }

}


    There are a lot of functions that you can override, but the main function that we are going to work with is the Initialize function which will allow us to override the appearance of our activity in the designer. This first thing that I am going to do is add a nice image to the activity. Assuming you already have an image that you want to use as a resource in your project you add the image to the activity's design view by doing the following:


protected override void Initialize(System.Workflow.ComponentModel.Activity activity)

{

base.Initialize(activity);

Bitmap WorkFlowImage = Properties.Resources.workflow;


Image = WorkFlowImage;


}


    The other thing I would like to do is change the text that appears in the activity. This will be the default text that shows up until the user of our activity sets the name property. This is easily done by setting the Text property in the Initialize function. After doing this the code should appear as follows:


    protected override void Initialize(System.Workflow.ComponentModel.Activity activity)

{

base.Initialize(activity);

Bitmap WorkFlowImage = Properties.Resources.workflow;


Image = WorkFlowImage;


//Set the Text That appears

Text = "FloFactory RegEx";


}


    Now we need to associate the designer class with our activity. We do this by going to the top of the RegEx.cs class and add the following attribute:

    [Designer(typeof(RegExDesigner), typeof(IDesigner))]

    public partial class RegEx: BaseActivity

    {

        …

}


    After adding this code to the Initialize function and adding the attribute if we now look at the RegEx activity we will see that our image has replaced the default image that appeared when the original designer class was applied to the RegEx activity. Also, the default text that was defined appears in the center of the activity.


    As you can see we have easily modified the image and the text that appears in the designer for our RegEx activity. In a future post I will cover modifying the appearance of the activity by changing its size and colors so as to create a more custom look and feel for the activity.


Sunday, 20 January 2008 20:38:13 (Central Standard Time, UTC-06:00)  #    Comments [0] - Trackback - Save to del.icio.us - Digg This! - Follow me on Twitter
.Net 3.0 | Development | Windows Workflow
# Friday, 28 December 2007

    I'm my last posting I walked through how to create a custom regex activity in Windows Workflow and I thought a good next step would be to give a short example of how you would add validation to this custom activity. In this particular instance we want to make the InputString property and the RegExpression property required in order for the workflow designer to consider the workflow that is being built a valid workflow. The first thing that needs to be done is to add a class to the project called RegExValidator.cs.


    The next thing that needs to be done to the new class is to add using System.Workflow.ComponentModel.Compiler to the top of the class and make it inherit from ActivityValidator. The one function that we need to override is the validate function. The validate function takes in a ValidationManager and an object. The object is what we will be using as this is the instance of our activity that we will be validating. The function returns a ValidationErrorCollection which is simply a collection of error messages that we will send back after validating the activity. In the override for this function we check that both the InputString and the RegExpression properties are not null or empty. If they are we add a corresponding error message to the collection. Because the error is associated with a property we provide the property name as the last parameter in the constructor for the ValidationError object so that the designer can associate the error message with the apporpriate property.


public class RegExValidator : ActivityValidator

{

public override ValidationErrorCollection Validate(ValidationManager manager, object obj)

{

RegEx myRegEx = obj as RegEx;

ValidationErrorCollection myErrors = new ValidationErrorCollection();


if (myRegEx != null && myRegEx.Parent != null)

{


if (myRegEx.InputString == null || myRegEx.InputString.Equals(String.Empty))

{

myErrors.Add(new ValidationError("InputString is required.", 101, false, "InputString"));

}


if (myRegEx.RegExpression == null || myRegEx.RegExpression.Equals((String.Empty)))

{

myErrors.Add(new ValidationError("RegExpression is required.", 102, false, "RegExpression"));

}

}


return myErrors;

}

}

    That is all we need to do for the validator class. The last thing we need to do is associate our validator with the activity. To do this we add the same using statement to our RegEx.cs activity (using System.Workflow.ComponentModel.Compiler) and we add an attribute to the top of the class.

     [ActivityValidator(typeof(RegExValidator))]

    public partial class RegEx: BaseActivity

    {

    …

    }

    That's it. If we now use the original sample workflow I created and blank out the InputString and RegExpression properties we will get several indications that there are errors. First in the designer it will be indicated directly on the activity.

    In the properties window it will also indicate each individual property that has an error.

    Finally the build will error and the error messages will be provided in the error window.


    That's all I have to say about validation. Obviously the validation can be much more complicated than just checking if the property has been provided, but this example hopefully provides a basic idea of how to get things going. Feel free to post a comment if you found this helpful and would like for me to dedicate more postings to the wonderful world of workflow. Now I'm off to go find a life since it appears that I am blogging on a Friday night. Unfortunately that's not something you can Google for!

Friday, 28 December 2007 20:54:49 (Central Standard Time, UTC-06:00)  #    Comments [0] - Trackback - Save to del.icio.us - Digg This! - Follow me on Twitter
.Net 3.0 | Development | Windows Workflow
# Wednesday, 26 December 2007

    While having lunch today at Old Chicago with Nick we began discussing Windows Workflow a bit and I started to realize that even though I have been pounding away on a project for six months that is highly dependent on WF I have yet to write a single blog post on the topic. I found the need today to work on an activity that simply applies a regular expression against a string and returns the value that it finds. Since this is a fairly basic activity I thought I would go ahead and blog about the process of creating it.

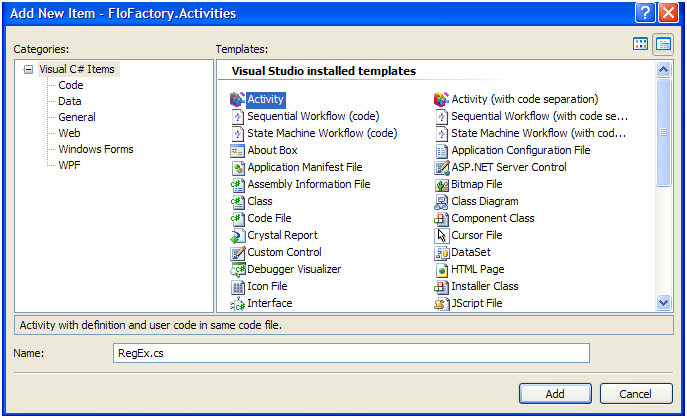
First off you need to create a new activity:


Visual Studio 2008 will create the skeleton of an activity for us that inherits from SequenceActivity. For my purposes I need to have it inherit from Activity so I will go ahead and change this. The next thing we need to do is to define a dependency property for our input string. To do this we do the following

#region "Dependency Properties"


public static DependencyProperty InputStringProperty = DependencyProperty.Register("InputString", typeof(String), typeof(RegEx));


#endregion

What we are doing here is registering a dependency property called InputStringProperty that is bound to the property InputString (which we will be creating in a second), the property of InputString is of type string and the owner of InputString (our activity) is of type RegEx. Now we need to define our property InputString.


     #region "Properties"


public string InputString

{

get { return ((String)(base.GetValue(RegEx.InputStringProperty))); }

set { base.SetValue(RegEx.InputStringProperty, value); }

}


#endregion

The layout of this property is fairly similar to what you should be useto, but instead of getting and setting from a private member variable you instead set and get from the dependency property. Piece of cake right? The next thing we are going to do is define our output parameter the same way. The only thing that we are going to do differently with this property is to put an attribute on it of readonly. This will prevent the user from binding this property to something since the user should only be binding the properties on other activities to this property.


public static DependencyProperty OutputStringProperty = DependencyProperty.Register("OutputString", typeof(String), typeof(RegEx));


     [ReadOnly(true)]

public string OutputString

{

get { return ((String)(base.GetValue(RegEx.OutputStringProperty))); }

set { base.SetValue(RegEx.OutputStringProperty, value); }

}


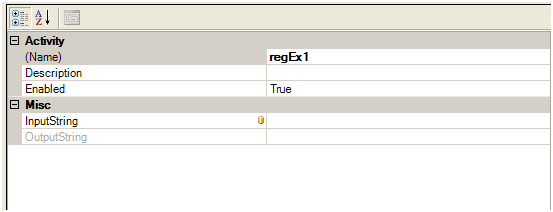
Though we are not complete yet, if you build this activity and drop it onto a test workflow you will see the following in your Visual Studio Properties Window. We have a property call input string that is bindable and a property called OutputString that is readonly.


The next things we need to do is to declare a property that will hold our regular expression for the user of our activity to input. The will not be a dependency property, but a standard property as it will not need the ability for binding.

     private string _regexpression;

     public string RegExpression

     {

get { return _regexpression; }

set { _regexpression = value;}

     }


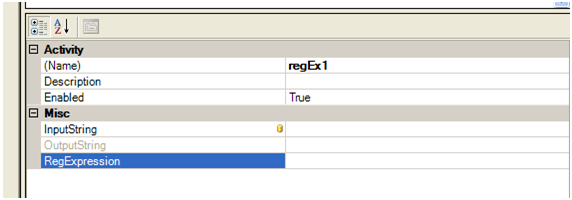
If you now drop this activity onto a test workflow you will see the following on the properties window.


We're almost done and all that is left to do is to implement the Execute method of our activity which will actually evaluate our regular expression against the input string. First off make sure you put using System.Text.RegularExpressions at the top of the class as we will obviously be using the .Net RegEx features. Then we just have the following function left.


protected override ActivityExecutionStatus Execute(ActivityExecutionContext executionContext)

{

Regex myRegEx = new Regex(RegExpression, RegexOptions.IgnoreCase);

OutputString = myRegEx.Match(InputString).Value;

return ActivityExecutionStatus.Closed;

}


The Exceute function is the meat of the activity where our processing actually happens. We first create a new RegEx object using our RegExpression property and in this case we are passing the option to ignore case. We then evaluate the regular expression and place the value into our OutputString property. Finally we return with a closed status and that's it. Just to test it out I put together a basic workflow that consists of my activity with the InputString property set to "my email address is testperson@test.com and of course it isn't a real email" and the RegExpression property set to "\w+([-+.']\w+)*@\w+([-.]\w+)*\.\w+([-.]\w+)*" which should pull out the email address. I then used a basic code activity to output the email address to the console.


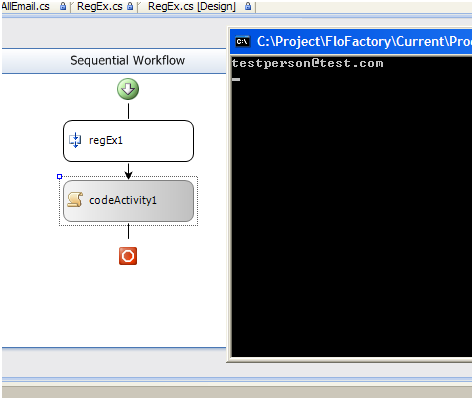
There you have it, a workflow activity that evaluates a regular expression against a string. If an email address had not been found then a blank line would have been written out to the console, but in our case we got testpersion@test.com. Obviously in a more practical scenario you would not type the string directly into the InputString property, but instead you would bind that property to the string property on an activity earlier in the workflow, but you get the idea. That's it for now folks. If you enjoyed this posting or found it helpful and would like to see me post more on WF feel free to post a comment.

Wednesday, 26 December 2007 21:39:10 (Central Standard Time, UTC-06:00)  #    Comments [3] - Trackback - Save to del.icio.us - Digg This! - Follow me on Twitter
.Net 3.0 | Development | Windows Workflow

Navigation
Archive
<2024 March>
SunMonTueWedThuFriSat
252627282912
3456789
10111213141516
17181920212223
24252627282930
31123456
About the author/Disclaimer

Disclaimer
The opinions expressed herein are my own personal opinions and do not represent my employer's view in any way.

© Copyright 2024
David A. Osborn
Sign In
Statistics
Total Posts: 70
This Year: 0
This Month: 0
This Week: 0
Comments: 33
Themes
Pick a theme:
All Content © 2024, David A. Osborn
DasBlog theme 'Business' created by Christoph De Baene (delarou)